




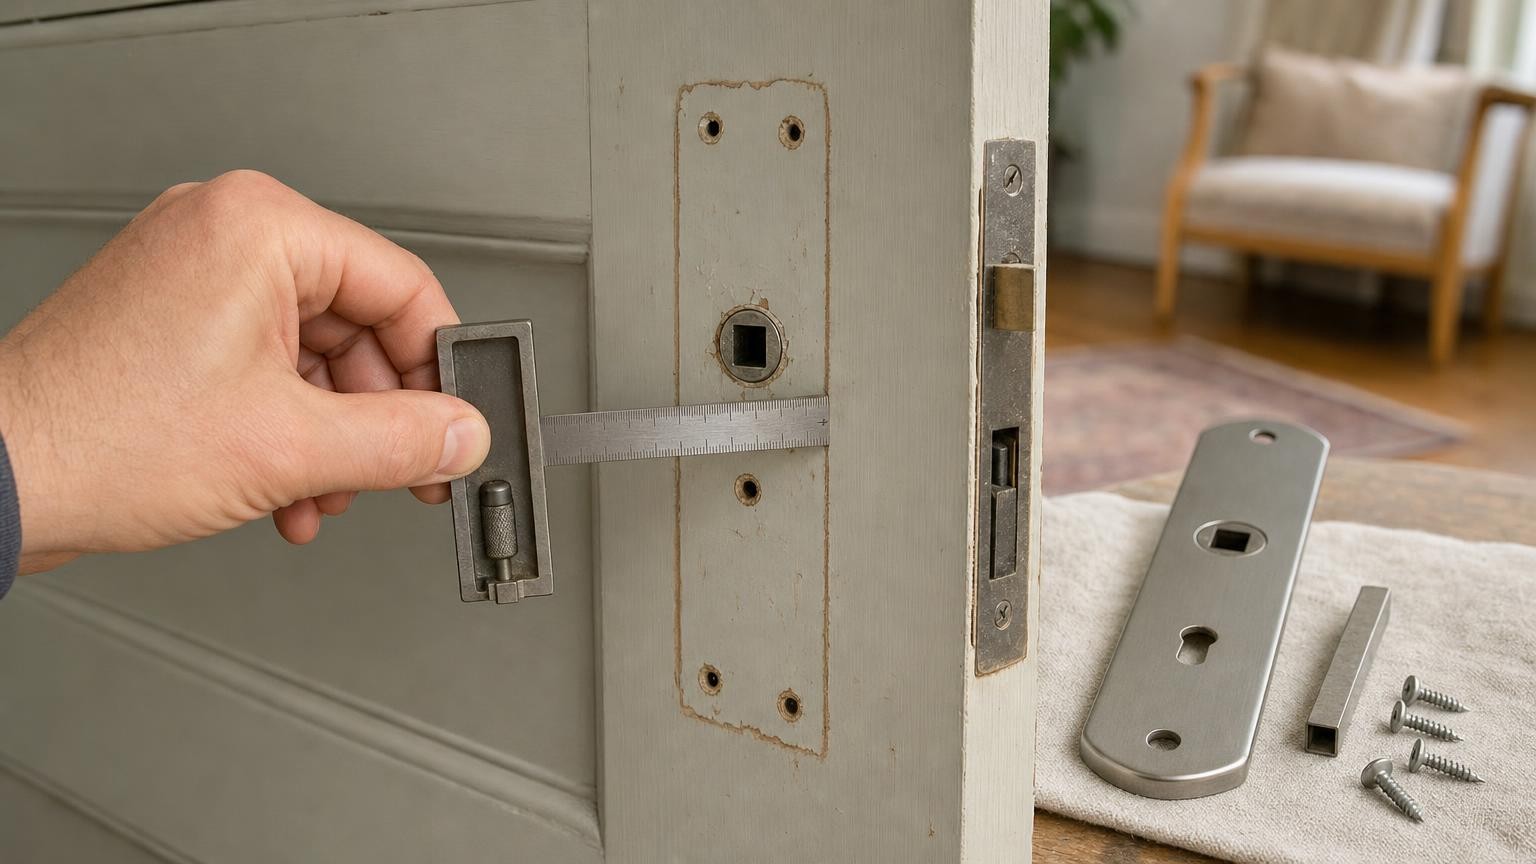
Replacing a door handle can look like a simple matter of finding a new set with screws in roughly the same places. In practice, those screws are only one part of an interconnected mechanism. The handles must turn the spindle, the spindle must operate the latch or lock, the fixings must avoid internal obstructions, and the new backplate or rose must suit the existing door preparation.
A handle that appears to fit may still feel loose, bind when tightened, fail to retract the latch fully or leave old holes and paint lines visible. Measuring the complete arrangement before buying is therefore more reliable than choosing by appearance or visible fixing holes alone.
Why matching the screw holes is not enough
A typical handle installation involves the handle pair, spindle, latch or lock case, fixing screws and the door itself. Each part imposes its own dimensional requirements. The screw positions may match while the spindle is too short, the keyhole is in the wrong place or the bolts collide with the lock body inside the door.
There are also two different aspects of fit to consider. Mechanical compatibility determines whether the handle can operate the latch or lock correctly. Visual coverage determines whether the new rose or backplate conceals redundant holes, dents and unfinished paintwork. A successful replacement needs to satisfy both.
Identify the existing handle and lock arrangement first
Begin by identifying the type of handle and the mechanism fitted in the door. This narrows down which measurements matter.
- Lever on backplate: The lever is mounted on a long plate. The plate may be plain, incorporate a traditional keyhole, have an opening for a cylinder, or include a bathroom turn and release.
- Lever on rose: The lever sits on a compact circular or square base. Any keyhole, cylinder escutcheon or bathroom turn is usually a separate fitting.
- Latch-only arrangement: The handle operates a sprung latch without a locking function.
- Key-locking arrangement: A lock case combines the latch operation with a key-operated locking mechanism. Its handle and keyhole positions are set by the case.
- Bathroom or privacy arrangement: The handle is accompanied by a thumbturn or similar control, with an external emergency release where applicable.
Do not assume that two long backplates are interchangeable because their outlines look similar. A latch-only plate may have no lock opening, while locking plates can use different opening shapes and centre distances. Likewise, changing from a backplate to a small rose may expose preparation that the old plate concealed.
How the spindle connects the handles to the latch
The spindle passes through the door and the follower in the latch or lock case, connecting the handles on both sides. It commonly has a square cross-section, but its actual dimensions should be checked rather than assumed. The spindle must fit the follower and the handle hubs without excessive play.
Length is equally important. It needs to pass through the lock or latch and engage securely with both handles after allowing for the door thickness, backplates or roses, and any mounting components. If it is too short, one handle may have inadequate engagement or pull away during use. If it is unnecessarily long, the handles may not seat correctly unless the spindle can be shortened in a suitable way.
Door thickness directly affects this requirement. Decorative plates, concealed fixing assemblies and adaptors can also consume spindle length. Measure the existing spindle and compare it with the complete fitting arrangement rather than considering the door slab alone.
An incorrect or poorly seated spindle can create symptoms that resemble a faulty handle: excessive movement, inconsistent latch retraction or a lever that does not return cleanly. Before blaming the handle spring, check that the spindle is the correct size, centred appropriately and securely retained.
Latch backset determines where the handle sits
Backset is the distance from the edge of the door to the centre of the spindle. It determines how far the handle sits from the door edge. Measure to the spindle centre, not to the front or back of the rose.
If a replacement handle is being used with the existing latch or lock, it must align with that established spindle position. If the latch is also being replaced, choosing a different backset moves the spindle centre. The old door holes may then become irrelevant, and new drilling or chiselling may be required.
A changed backset can also affect comfort and clearance. A handle positioned too close to the edge may leave limited space for fingers near the frame or stop moulding. Moving it farther inward can avoid that issue, but doing so turns a straightforward hardware change into a modification of the door. Shoppers hoping for a simple replacement should normally identify the existing backset before selecting a new latch.
Fixing centres and hidden obstructions
Fixing centres are measured from the centre of one fixing to the centre of the other, rather than from their outer edges. This measurement is particularly important when reusing existing holes or fitting bolt-through hardware.
Matching the visible centres does not guarantee a clear route through the door. Bolt-through fixings pass from one side of the handle set to the other, so their paths must avoid the latch or lock case. A screw can line up perfectly with a hole in the door face yet meet solid metal inside.
Some handle sets use different fixing systems, including screws into the door surface, paired bolts, concealed mounting plates or combinations of these. Examine the existing arrangement after carefully removing one side. Note both the visible hole pattern and the positions of the mechanism within the door. If replacement bolts are supplied, their diameter and usable length also need to suit the door and handle assembly.
Door thickness, handing and return geometry
Door thickness influences more than the spindle. Through-bolts must be long enough to connect the two sides without bottoming out, while screws must not protrude or prevent the plates from sitting flush. Check the fitting’s stated door-thickness arrangement against the actual door, including any substantial facing or decorative layer.
Handing describes whether a component is intended for a left-opening or right-opening arrangement. Many lever handles can be fitted on either side, but this is not universal. Asymmetrical lever shapes, offset designs and some lock components may be handed or may require reconfiguration. Check the orientation from the relevant side of the closed door and follow the fitting’s own handing convention.
Lever shape matters as well. Projection is how far the handle extends from the door face, while the lever’s return describes how its end curves or turns back towards the door. These features can affect clearance beside architraves, raised mouldings, glazed panels and nearby walls. A long or sharply styled lever may fit the spindle correctly but strike the frame or be awkward to grasp in a confined position.
Backplate size must cover the old footprint
The overall height and width of a new backplate or rose should be compared with the old fitting’s footprint. Removing the existing handle may reveal screw holes, compressed timber, dents, discolouration or a paint edge. A replacement that is only slightly smaller can expose these marks even when its functional components align.
Measure the maximum height and width of the old plate, then record where the spindle and fixings sit within that outline. Two plates can share overall dimensions but position the lever or screws differently. Conversely, a larger plate may cover the old footprint while requiring new fixing holes.
Changing from a long backplate to a rose deserves particular care. A compact rose rarely conceals the full area covered by a backplate. Filling, sanding and refinishing may be necessary before the smaller fitting can look intentional. Separate escutcheons or turns may also leave parts of the former plate area exposed.
Coverage should not be achieved by forcing a plate to sit over raised screw heads, damaged material or an uneven surface. The fitting needs a stable, reasonably flat mounting area so that tightening the screws does not distort the plate or hinder the lever.
Keyholes, lock centres and bathroom turn spacing
On a locking backplate, the distance between the spindle and the keyhole, cylinder opening or bathroom turn must correspond with the existing lock case. This is usually measured from the centre of the spindle to the centre of the relevant lower opening.
This dimension is separate from the fixing centres. A product description may therefore contain several centre measurements that refer to entirely different features. Confirm which points each dimension connects before comparing fittings.
The opening type must also match. A traditional keyhole, a profile-cylinder cut-out and a bathroom thumbturn opening are not interchangeable simply because they occupy a similar area on the plate. With separate roses and escutcheons there can be more freedom over external styling, but the spindle, cylinder or turn must still align with the mechanism inside the door.
A measurement-led replacement checklist
Use a consistent sequence so that no important dimension is overlooked:
- Remove one handle carefully. Keep the other side supported and retain the screws, spindle and any adaptors for reference.
- Identify the mechanism. Establish whether it is a latch, key-operated lock or bathroom lock, and note the shape of any keyhole or cylinder opening.
- Measure the spindle. Record its cross-section and overall length, then check how deeply it engages with each handle.
- Measure the backset. Measure from the door edge to the spindle centre.
- Record the fixing centres. Measure centre to centre and inspect whether through-bolts have a clear path around the latch or lock body.
- Measure the door thickness. Include relevant facing layers and consider the thickness of both handle mounting assemblies.
- Record the footprint. Measure the old backplate or rose and note paint lines, dents and holes that the replacement should cover.
- Measure lock centres where relevant. Record the spindle-to-keyhole, spindle-to-cylinder or spindle-to-turn distance, keeping it distinct from screw spacing.
- Check handing and clearance. Consider lever orientation, projection and nearby frames, mouldings or walls.
- Decide the scope of replacement. If the dimensions align, the handle alone may be replaceable. If they do not, determine whether changing the latch or lock and modifying the door is practical.
Photographs taken during removal can help record component orientation and screw positions. Keep measurements labelled, as an unmarked list of similar dimensions can easily cause confusion when comparing options.
Choose for operation as well as appearance
A replacement handle should look appropriate, cover the old fitting area and operate smoothly. Before final tightening, dry fit the components and check that the spindle turns freely, the latch retracts fully and the lever returns without rubbing or binding. Tighten fixings evenly, as overtightening or pulling misaligned plates together can impair movement.
Also consider how the handle and latch share the task of returning the lever. Depending on the arrangement, springing may be provided by the handle, the latch or both. A visually compatible handle can still feel unsatisfactory if the complete mechanism does not return reliably.
The safest buying approach is therefore measurement-led: identify the existing arrangement, check every functional centre and confirm that the new fitting covers the previous footprint. Matching screw holes is helpful, but it is only one part of achieving a secure, tidy and usable replacement.
Continue exploring on Frowse
Best Sellers · Top Rated · Fresh Finds · Under £50
Explore products on Amazon
Looking for products related to this guide? to enter your own search term.
Discover More Frowse Insights
- End Grain, Edge Grain and Face Grain Cutting Boards Explained
- Why More Ceiling-Fan Blades Do Not Automatically Mean More Airflow
- Why Solar Garden Lights Fade Before Dawn
- Clumping Clay, Silica and Plant Fibre: How Cat-Litter Materials Behave Differently
- Machine-Woven, Tufted and Hand-Knotted Rugs: What Construction Changes