




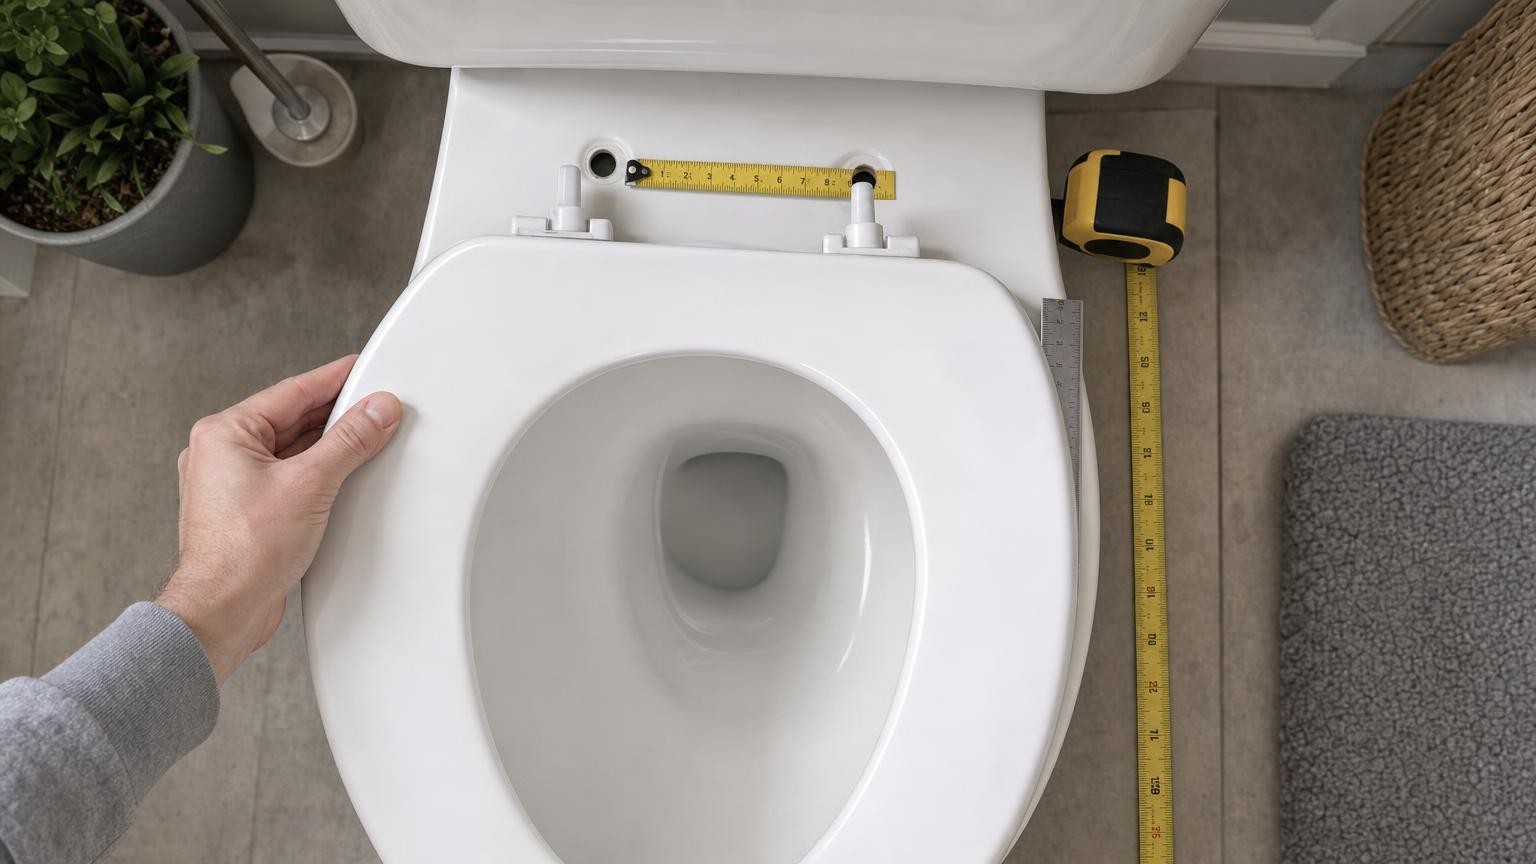
A replacement toilet seat can be described as round, oval or D-shaped and still sit badly on the toilet. It may project beyond the front, leave ceramic exposed at the sides, twist during use or refuse to remain centred. These problems usually arise because the label describes only the seat’s general appearance, not its precise geometry or fixing requirements.
A reliable fit depends on the pan outline, the distance between the fixing holes, the distance from those holes to the front of the pan, the pan width and the type of access available for installation. Hinge adjustment can accommodate some variation, but it cannot turn a fundamentally unsuitable seat into a good match.
Why a toilet seat can look right but fit badly
Toilet pans do not follow one universal set of dimensions. Two pans can both appear oval while differing in length, width, taper and curvature. Even small differences become obvious once a seat is installed because its edge creates a clear visual line against the ceramic below.
The position of the fixing holes is equally important. A seat with the correct outline may sit too far forwards or backwards if its hinges cannot align with the pan. It might also fit visually but remain unstable because the mounting plates do not sit flat or the supplied hardware is unsuitable for the toilet’s construction.
The aim is not necessarily to find a seat that reproduces every edge of the pan exactly. Some designs intentionally sit slightly inside the ceramic rim. The important points are that the seat is centred, supported at its contact pads, comfortable to use and securely attached without relying on extreme hinge adjustment.
Start with the pan shape, not the old seat
An existing seat is useful as a reference, but it may already be the wrong size or shape. Copying its measurements can reproduce the same overhang, exposed rim or instability. Measure the ceramic pan as well as the old seat, then compare both with the dimensions of a potential replacement.
Look at the pan from directly above. Consider more than a broad shape label:
- Front curvature: Some fronts form a broad curve, while others are tighter or nearly straight.
- Side profile: The sides may remain parallel, taper towards the front or curve continuously.
- Rear and hinge area: A D-shaped pan may have a noticeably straight rear section, but the length and corner radius of that section can vary.
- Overall proportions: Two pans of similar length can have different widths and therefore require different seat outlines.
A poor outline match can leave the seat resting incorrectly. If its bumpers or pads miss the intended ceramic surface, the seat may flex or rock. A visually small discrepancy can therefore become a practical stability problem.
The measurements that determine alignment
Use a rigid tape measure or ruler where possible, and record dimensions in millimetres for easier comparison. Keep the tape straight rather than following the curve of the pan.
Fixing-hole spacing
Measure from the centre of one fixing hole to the centre of the other. This is the centre-to-centre spacing, not the gap between the inner edges of the holes. If the old seat is still installed, removing it usually makes the centres easier to identify.
Some hinges can accommodate a range of hole spacings, but that range should be checked against the actual measurement. A vague description such as “adjustable” does not establish that the mounts will reach both holes while keeping the seat centred.
Projection or seat length
Measure from an imaginary line running through the centres of the fixing holes to the front edge of the ceramic pan. Keep the measurement perpendicular to that line. This dimension is often called the projection.
Do not simply measure from the cistern, wall or rear edge of the toilet. The fixing-hole centres are the relevant reference because they determine where the hinge mechanism begins. A seat that is too short may expose a large section of ceramic at the front, while one that is too long may overhang or obstruct nearby fittings.
Maximum pan width
Measure across the widest part of the pan from one outer ceramic edge to the other. Check where the maximum width occurs because some pans broaden near the centre while others remain wide farther towards the front.
The seat’s quoted width should be interpreted alongside its outline. Matching the maximum number alone does not guarantee that the side curves will align at other points.
Hinge adjustment helps, but it cannot correct everything
Adjustable hinges are valuable because toilets and mounting holes vary. Depending on the design, adjustment may come from sliding mounting plates, posts that move within slots or circular plates that rotate to change the post position. These mechanisms may allow changes to both hole spacing and the seat’s forward or backward position.
Adjustment is best used for final alignment. It can centre a suitable seat, correct a modest difference in mounting position or allow the lid to clear the rear of the pan. It cannot correct an outline that is much too narrow, a front that has the wrong curvature or a seat whose support pads do not land on the rim.
Adjustment can also involve a trade-off. Moving a mount to the extreme end of its slot may provide the required reach but leave less secure contact between components. Before buying, compare the stated adjustment range with the measured dimensions and consider whether the seat will fit comfortably within that range rather than only at its limit.
Top-fixing and bottom-fixing toilets need different installation access
Toilet seats are commonly attached using either top-fixing or bottom-fixing hardware. The distinction concerns how the fastener is secured, not merely where the bolt head can be seen.
With a bottom-fixing arrangement, a bolt passes through the pan and is secured by a nut or fitting underneath. This requires enough access to reach below the fixing holes, often while holding the upper hinge in position.
A top-fixing system is tightened from above. Its fixing expands, grips or anchors inside the hole, depending on the design. This is particularly relevant when the sides or underside of the pan are enclosed, as can occur with some back-to-wall or fully shrouded toilets.
Inspect the toilet before choosing a fixing kit. If you can clearly reach the underside of both mounting holes, bottom fixing may be possible. If the ceramic is enclosed and no access panel is available, a suitable top-fixing arrangement may be necessary. Do not assume that every top-fixing kit suits every hole size or pan construction, or that any hinge can accept any alternative set of bolts.
Why seats loosen, twist or creep sideways
A loose seat is not always the result of insufficient tightening. Movement can begin when the fixing holes and hinges are poorly aligned, causing the installation to remain under sideways tension. Repeated use then encourages the mounts to rotate or slide.
Other common causes include:
- Poorly centred hinges: Uneven positioning can make one side carry more force than the other.
- Unsuitable fixings: A fixing that does not grip the hole properly may turn or pull upwards.
- Uneven ceramic: Mounting plates may rock if their footprint does not sit securely on the surface.
- Compressed pads or washers: Soft components can settle after installation, reducing clamping pressure.
- Misplaced seat bumpers: If the supports do not contact the rim evenly, the seat can flex and transfer leverage to the hinges.
- Inadequate tightening: A fitting that was only finger-tight may work loose quickly.
More force is not always the solution. Overtightening may distort plastic parts, strip threads or place excessive stress on ceramic. Follow the relevant fitting instructions, tighten both sides evenly and recheck alignment as the fixings become firm. If the design permits it, checking the fittings again after initial use can reveal components that have settled.
Seat and hinge details that affect long-term fit
Material and construction influence how a correctly sized seat behaves over time. A relatively rigid seat may feel stable when its supports are properly positioned, but it can rock on an uneven or poorly matched rim. A more flexible seat may accommodate small variations, although excessive flex can place repeated stress on its hinges.
Contact pads underneath the ring and lid deserve attention. Their number, height and location determine where loads are transferred to the pan. They should land securely on the ceramic rather than close to an edge or over an unsupported gap.
The footprint of each hinge plate also matters. A broad plate may spread load over a larger area, but it still needs a reasonably suitable surface on which to sit. Smaller plates may fit confined hinge areas more easily but can be more sensitive to movement if the fixing is not secure.
Soft-close hinges control the descent of the seat or lid, but they do not compensate for poor sizing or mounting. Their mechanisms may also make the hinge assembly larger, so rear clearance and adjustment remain important.
Quick-release designs can make cleaning around the hinges easier. However, removable connections introduce an additional interface that must engage correctly. Ease of removal is useful only if the seat returns to a firm, repeatable position after refitting. Treat soft-close and quick-release functions as ownership features, not substitutes for basic compatibility.
A pre-purchase compatibility check
- Identify the pan outline. View it from above and note the front curve, side taper and shape around the hinges.
- Measure the fixing-hole centres. Record the centre-to-centre distance rather than the gap between the holes.
- Measure the projection. Start at the line through the hole centres and finish at the front edge of the pan.
- Measure the maximum width. Note both the width and where it occurs along the pan.
- Inspect installation access. Confirm whether the underside of the fixing holes can be reached or whether fixing must be completed from above.
- Compare actual adjustment ranges. Check that the measured hole spacing and projection sit within the hinge’s usable range.
- Check support points and clearances. Consider whether the bumpers will rest on the rim and whether the hinges and lid have enough room at the rear.
- Confirm the supplied hardware. Establish whether the fixing method is suitable rather than assuming that “universal” means compatible with every toilet.
If product dimensions are unclear, avoid relying on a photograph alone. Perspective can make a seat appear wider, shorter or more rounded than it is, and similar-looking hinge covers can conceal different adjustment mechanisms.
A good replacement fit is a geometry-and-fixings match
The general shape of a toilet seat is only the beginning of a compatibility check. A dependable replacement must suit the pan’s actual outline and dimensions, align with its fixing holes, rest correctly on the rim and use hardware that can be installed through the available access.
Adjustable hinges provide useful tolerance, but they work best for fine positioning rather than rescuing the wrong size or shape. Measuring the ceramic pan, checking the fixing method and comparing those findings with the seat’s dimensions offers a much stronger basis for choosing than appearance alone. That preparation is what helps a replacement sit straight, feel stable and remain secure in everyday use.
Continue exploring on Frowse
Discover More Frowse Insights
- Why Replacement Zip Sliders Are So Difficult to Match
- What a Watch Water-Resistance Rating Actually Tells You
- Fan-Assisted, Convection and True Convection Ovens Explained
- Roller Skate Wheels Explained: Diameter, Hardness, Profile and Hubs
- What Makes a Paintbrush Hold Paint, Cut Cleanly and Keep Its Shape?