




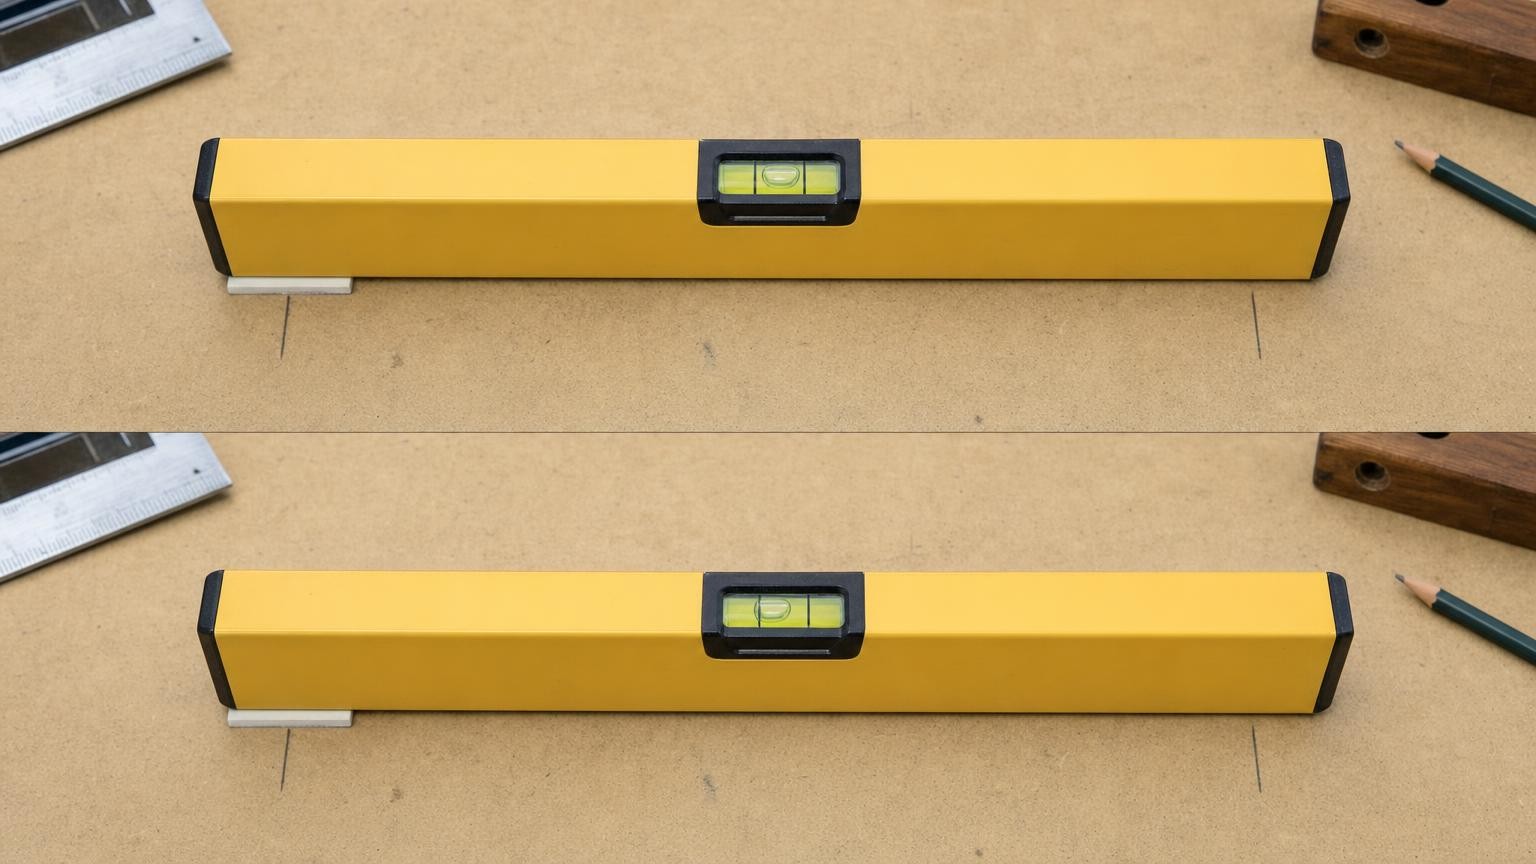
A spirit level may look like a simple tool, but a trustworthy reading depends on several parts working together. The bubble must respond predictably, the vial must be aligned with the working face, the frame must resist bending and the reference surface must be straight and clean. If any one of these elements is wrong, a bubble sitting neatly between the lines may still give a misleading result.
This is why appearance alone is not a reliable guide to quality. A heavy frame, highly visible vial or fast-moving bubble can make a level feel precise without proving that it is accurate. Understanding how the complete tool produces a reading makes it easier to compare levels before buying and to recognise damage during use.
Accuracy Is More Than Getting the Bubble Between the Lines
A level indicates whether its reference face is horizontal or vertical by showing the position of a bubble inside a curved vial. When the bubble is centred between the marked lines, the tool is intended to indicate level or plumb.
For that indication to be trustworthy, the centre of the vial must correspond accurately with the level’s working face. The frame also needs to preserve that relationship when the tool is handled, stored and placed against a surface.
Several faults can produce a convincing but incorrect reading. A vial can be slightly misaligned, a frame can be twisted, or a working edge can have a dent or raised burr. The bubble may behave normally in all of these cases. True accuracy is therefore about how closely the indicated position corresponds to the real angle, not simply whether the bubble is easy to centre.
Sensitivity and Accuracy Are Not the Same Thing
Sensitivity describes how far the bubble moves in response to a small change in angle. Accuracy describes how closely the indicated reading agrees with true level or plumb. The two qualities are related to vial design, but they are not interchangeable.
A sensitive vial makes small angular changes visible because the bubble travels noticeably as the tool tilts. This can be useful when making fine adjustments. However, a highly sensitive vial can still be mounted incorrectly. It may show tiny changes clearly while consistently indicating the wrong centre point.
Very high sensitivity can also make a reading difficult to settle on an uneven, vibrating or slightly flexible surface. The bubble may move with every minor adjustment, making it harder to judge a repeatable position. A less sensitive vial can be calmer and easier to interpret, although it may reveal small deviations less clearly.
The useful balance depends on the work. The important shopping lesson is not to treat rapid bubble movement as proof of accuracy. Responsiveness is a reading characteristic; calibration determines whether that reading is correct.
How Vial Curvature Controls Bubble Movement
The inside of a spirit-level vial is curved rather than perfectly straight. The bubble naturally moves towards the highest point of that curve. When the tool is in its intended level or plumb position, the bubble should settle at the marked centre.
The radius and shape of the curve influence how far the bubble travels for a given change in angle. A shallower curve generally allows more visible travel from a small tilt, producing greater sensitivity. A tighter curve limits that travel and can make the indication feel steadier.
Neither response is automatically better in every situation. A clearly moving bubble can help with precise alignment, but only if the markings are readable and the bubble settles consistently. On ordinary building surfaces, excessive movement can magnify tiny variations that are not relevant to the task. Conversely, a bubble that barely moves may make fine alignment difficult to judge.
Visibility matters as well. The vial should be easy to view from the positions in which it will be used, with clear markings and enough contrast to judge the bubble without relying on an awkward viewing angle. Visibility supports consistent interpretation, but it does not compensate for poor calibration.
Calibration Tolerance and Vial Alignment
The vial has to be oriented and fixed precisely relative to the level’s reference surface. Any offset between the vial’s centre position and that surface creates a systematic error. The tool may then repeat the same reading reliably while still being wrong.
Manufacturing tolerances describe the permitted difference between the indicated angle and the true angle. Where a manufacturer states a tolerance, it should be clearly defined and expressed in meaningful terms, often as a deviation over a given distance. A bare claim of precision is less useful than a defined tolerance with an identified measurement condition.
Vial mounting also has to remain stable. Poor seating, movement in the fixing material, impact damage or stresses within the frame can alter alignment. Temperature changes may affect materials differently, particularly if the vial, holder and frame expand or contract at different rates. This does not mean that normal temperature variation will necessarily cause a fault, but stable construction helps maintain the original relationship between the parts.
A vial can therefore look intact even after its calibration has shifted. Cracks, leaks and cloudiness are obvious reasons to reject a level, but an undamaged-looking vial should still be checked if the tool has been dropped or begins producing doubtful results.
Why Frame Stiffness Matters
The frame connects the vial to the working face. If it bends or twists, the vial and reference surface no longer remain in the calibrated relationship intended by the manufacturer.
Rigid box-section frames are often chosen where resistance to bending and twisting is important. Lighter profiles may be easier to carry, position overhead or use repeatedly, but their performance depends on profile design, material distribution and reinforcement rather than weight alone. A thick-looking frame is not necessarily straight, and a lighter frame is not necessarily inaccurate.
Longer frames face greater leverage when lifted at one end or pressed against an uneven surface. Cut-outs, handles, end caps and joints can also influence how forces travel through the tool. Reinforcement around vulnerable areas may improve stiffness, but construction quality matters more than the mere presence of additional features.
Damage can be subtle. A dent near the working edge, a slight permanent bow or movement around a vial holder may be enough to affect readings. A level should not be used as a lever, straightedge for forceful work or striking tool, since loads outside its measuring role can change its geometry.
The Reference Surface Must Be Straight and Consistent
The edge placed against the work is part of the measuring system. Even a perfectly aligned vial cannot give a reliable result if that edge is bowed, twisted or resting on a raised obstruction.
Reference faces may be machined, ground, extruded or otherwise finished to provide a consistent contact surface. What matters in use is that the face is straight and that it contacts the work predictably. A small burr, dried adhesive, plaster, grit or paint can lift one end and create an angular error.
Magnetic levels require the same care. Magnetic inserts should not create uneven high points, and metal filings collected around them can prevent proper contact. Magnets help hold a tool in place; they do not make its frame or vial more accurate.
Inspect the working faces for dents, nicks and contamination. Clean both the tool and the work before judging a reading. Repositioning the level along the same surface can help reveal whether an unexpected result comes from the level or from a local bump in the material being checked.
What Level Length Changes – and What It Does Not
A longer level measures across a greater span. This can be useful on walls, worktops, frames and long runs because it bridges small local hollows and high spots that might dominate the reading of a short tool. A small angular deviation also produces a larger height difference over a longer distance, making the practical effect easier to see.
A shorter level is easier to use in restricted spaces and may be entirely appropriate for compact components. Its reading describes the area it actually contacts, however, so it may sit on a local irregularity that is not representative of the whole surface.
Length should therefore be matched to the scale and access requirements of the job. It should not be confused with inherent accuracy. A long level with a warped frame or misaligned vial remains inaccurate, while a properly calibrated short level can be trustworthy within the span it measures.
Longer tools also require suitable storage. Supporting a long level poorly, placing heavy objects on it or allowing it to lean where it can be knocked may eventually affect straightness. Length adds capability, but it can also increase vulnerability to bending and handling damage.
Use the Reversal Test to Check a Level
A reversal test is a practical way to detect a consistent offset. It compares the level against itself, so the test surface does not have to be perfectly horizontal or vertical. It does need to be stable, reasonably flat and suitable for repeatable placement.
Checking the horizontal vial
- Clean the level’s working face and the test surface.
- Place the level in a fixed position and mark the locations of both ends so that the placement can be repeated.
- Note the bubble position. For the clearest comparison, use thin shims if necessary to bring the bubble exactly to the centre.
- Rotate the level end for end on the same surface, keeping the same working face down and returning it to the marked footprint.
- Compare the second reading with the first. If a centred bubble remains centred, the result is consistent. If it moves away from centre, the level may have a calibration, frame or reference-face error.
If shims are not used, compare the displacement carefully rather than assuming that any off-centre reading proves a fault. Repeat the test to rule out debris, unstable support or inaccurate repositioning.
Checking the vertical vial
- Choose a stable vertical surface and clean the contact area.
- Place the level against it, mark the tool’s position and note the plumb-vial reading.
- Turn the level end for end while maintaining equivalent contact with the same area.
- Compare the readings. A meaningful change suggests that the indicated plumb position is not consistent.
Testing more than once and, where relevant, checking both usable faces can help identify whether the error is associated with a particular reference edge. A reversal test reveals inconsistency, but it does not by itself identify whether the underlying cause is the vial, frame or working face.
Assessing Accuracy Before Buying and During Ownership
When comparing spirit levels, consider how the stated features support repeatable measurement rather than focusing on appearance alone. Useful points to assess include:
- Defined tolerance: Look for a clearly explained accuracy tolerance rather than an unsupported description such as professional or precision.
- Appropriate length: Choose a span that represents the surfaces being measured while remaining practical for the available space.
- Frame construction: Consider stiffness, resistance to twisting and protection around the vials, not simply overall weight.
- Reference faces: Inspect for straight, consistent working edges and check whether magnetic components sit evenly.
- Vial visibility: Make sure the relevant vials and markings can be read from realistic working positions.
- Repeatability: Where inspection is possible, use a reversal test rather than relying only on a single centred reading.
Accuracy also needs to be preserved after purchase. Keep contact faces clean, store the level where it will not bow or be crushed, and avoid dropping it. Recheck it after an impact, heavy use or any result that conflicts with another trusted reference. Periodic reversal testing is a simple way to detect a developing problem before it affects a larger piece of work.
A Trustworthy Reading Depends on the Whole Tool
A spirit level is accurate only when its vial, calibration, frame and reference surface work as one stable system. Vial curvature determines how the bubble responds, but sensitivity does not guarantee correctness. Frame stiffness preserves alignment, while a straight and clean working face ensures that the tool sits at the angle it is supposed to measure.
Length affects the area represented by the reading and the tasks for which the tool is suitable, but it cannot repair poor calibration or damage. The most useful check is consistency: place the tool carefully, reverse it and see whether it tells the same story. That approach is more informative than judging accuracy by size, weight, materials or a reassuringly lively bubble.
Continue exploring on Frowse
Discover More Frowse Insights
- Why Battery Voltage Does Not Tell You How a Cordless Lawn Mower Will Cut
- How an Electric Kettle Knows When the Water Has Boiled
- Why Rechargeable AA Batteries Are 1.2 Volts – and When That Matters
- Why Baking Trays Warp in the Oven and Sometimes Flatten Again
- Why Vacuum Storage Bags Slowly Reinflate – and What to Check Before Buying