




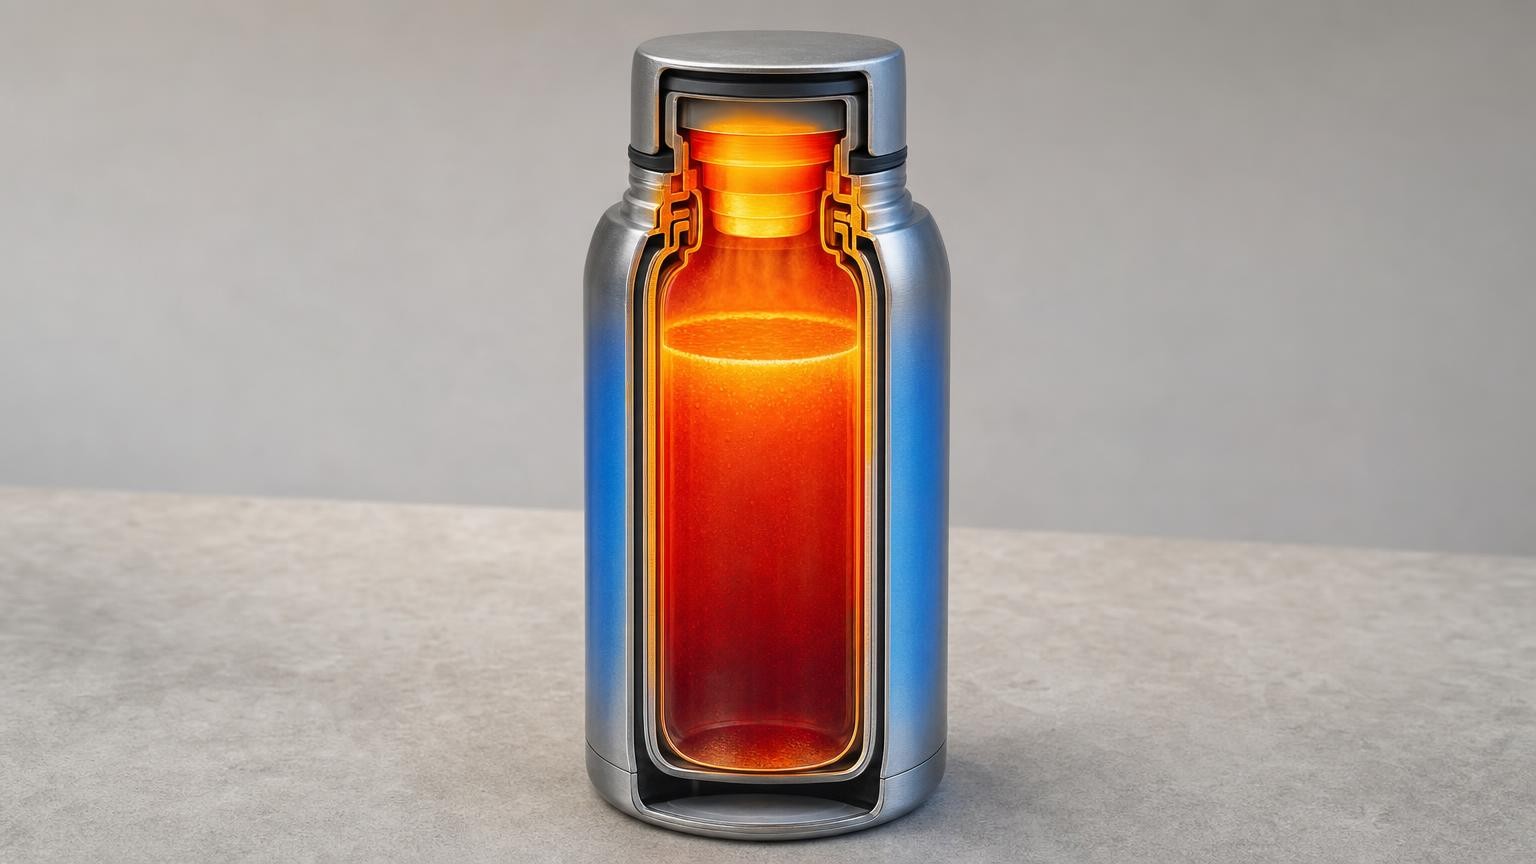
A vacuum flask is often described as though the vacuum does all the work. In reality, insulation depends on a connected system: the inner and outer walls, the evacuated gap, reflective surfaces, the neck, seals, stopper and lid. Heat looks for every available route through that system, and it does not need to pass directly through the insulated side walls.
This is why two flasks with similar capacities can behave differently, and why the same flask may retain temperature well in one routine but less effectively in another. Mouth width, closure design, fill level and opening frequency can matter as much as the headline capacity. Understanding those factors makes it easier to choose a flask for how it will actually be used.
The three ways heat gets in or out
Heat moves by conduction, convection and thermal radiation. A vacuum gap greatly restricts two of these mechanisms, but it does not eliminate every path.
- Conduction transfers heat through materials that are in physical contact. In a flask, heat can travel through the inner wall, neck, seams, stopper components and any other solid connections between the interior and exterior.
- Convection transfers heat through moving liquids or gases. Removing most of the gas between the flask walls largely suppresses convection there, but air and liquid can still circulate inside the flask, around the mouth and within parts of the closure.
- Thermal radiation transfers energy as electromagnetic radiation and does not require air. It can therefore cross a vacuum unless the surfaces are designed to reduce it.
For a hot drink, these processes move energy towards the cooler surroundings. For a cold drink, they work in the opposite direction, allowing heat from the surroundings to enter. The engineering challenge is essentially the same in both cases: limit all available heat paths, not just one.
What the vacuum gap does – and what it cannot do
The evacuated space between the inner and outer walls is the defining feature of a vacuum flask. Because this gap contains very little gas, there are far fewer molecules available to conduct heat or create convective currents. That makes the body of the flask much more effective than a comparable single-wall container at slowing temperature change.
However, the inner vessel cannot float without support. It must connect to the rest of the flask somewhere, particularly around the neck. Manufacturing seams, structural supports and base components may also create solid paths. These are often called thermal bridges because they allow some heat to bypass the vacuum gap.
The neck is especially important because it must provide both structural continuity and an opening for filling and pouring. Even when carefully designed, it remains a route through which heat can conduct. The mouth also interrupts the insulated wall system entirely and introduces seals, threads, valves or other closure parts.
Vacuum insulation should therefore be viewed as excellent wall insulation rather than a guarantee for the complete vessel. Overall performance is influenced by how effectively the remaining heat paths are controlled.
Why reflective surfaces reduce radiant heat transfer
A vacuum suppresses gas conduction and convection, but radiation can still travel across empty space. Flasks may use reflective or low-emissivity surfaces to reduce this transfer. Such a surface emits and absorbs less thermal radiation than a more emissive one, helping to slow radiant exchange between the inner and outer walls.
This function is separate from the vacuum itself. The evacuated gap limits heat carried by matter, while the surface treatment addresses radiation. Both can contribute to the performance of the insulated body.
A visibly shiny exterior does not prove that the relevant internal surfaces have been treated effectively. Exterior colour and finish may be chosen for appearance, grip or durability and reveal little about what happens inside the wall cavity. Shoppers generally need to assess the flask as a complete design rather than treating external shine as a shortcut for judging insulation.
The neck, stopper and lid are the main thermal weak points
The mouth assembly is commonly one of the most demanding parts of a flask to insulate. It combines solid materials, joints, seals and a direct opening to the contents. Heat can conduct through the neck and closure, while air movement around a poor or damaged seal can create an additional route.
A wide mouth improves access for filling, adding ice and cleaning. It can also expose a larger area when opened and requires a broader stopper or lid. A narrow mouth presents a smaller opening and may reduce exchange during a quick pour or sip, but it can be harder to clean by hand or use with large ice cubes.
Closure material and shape matter too. A stopper is not simply a barrier to liquid leakage. It occupies the point where the vacuum-insulated walls stop, so its internal structure, fit and contact with the neck influence heat flow. Components inside a thick lid can also absorb some energy when the flask is first filled.
Seal condition is part of the system. A gasket that is twisted, dirty, worn or incorrectly seated may prevent the closure from fitting as intended. Even without obvious leaking, a closure that does not seat properly can leave more opportunity for air and vapour exchange. Inspecting and cleaning removable seals can therefore matter to both everyday function and temperature retention.
Pouring convenience versus heat retention
Convenience features change the thermal design. A simple screw stopper may offer relatively few joints and channels, but it normally requires the user to open the flask for every pour. A push-button pourer can dispense without removing the whole closure, although it introduces moving components and internal passages. Drinking spouts provide quick access, while straw systems create a path extending towards the liquid.
Cup-style lids can be useful when a separate drinking vessel is wanted. The stopper beneath the cup remains the critical closure, and pouring into the cup briefly opens the system. Direct-drink lids avoid that extra vessel but may be opened many more times during the day.
None of these arrangements is automatically best. A more complex closure may support shorter, more controlled openings, yet it may also contain more seals, crevices and parts requiring cleaning. A simpler design may be easier to inspect and maintain but less convenient for frequent one-handed use.
The useful question is not merely which lid has the fewest parts. It is which closure encourages the behaviour required. Someone pouring two servings over several hours has different needs from someone taking small sips every few minutes.
Capacity, fill level and the role of headspace
Capacity describes how much a flask can hold, not how efficiently it limits heat transfer. A larger flask is not automatically better insulated, and choosing extra capacity can be counterproductive if it will usually be only partly filled.
The unfilled space above the liquid is called headspace. Air in this space can warm or cool, circulate within the vessel and exchange with outside air whenever the closure opens. A partly filled flask also contains less liquid to store thermal energy. Because there is less drink, a given amount of heat gained or lost can produce a larger change in its temperature.
The relationship is not determined by headspace alone. Flask shape, liquid surface area, mouth geometry and closure design all contribute. A broad vessel may present a different liquid surface from a tall, narrow one at the same fill volume. Movement during carrying also mixes the liquid and headspace.
For shopping purposes, it is sensible to choose capacity around the amount normally carried rather than assuming that the largest option will retain temperature best. Spare volume can be valuable when it is genuinely needed, but unused capacity is not free insulation.
Why opening frequency can dominate real-world performance
Every opening temporarily removes one of the flask’s most important barriers. With a hot drink, warm air and vapour can escape and be replaced by cooler outside air. With a cold drink, warmer and potentially more humid outside air enters. Pouring or sipping also removes liquid whose thermal energy is no longer available to stabilise the remaining contents.
A flask left closed between two occasional pours operates under very different conditions from one opened repeatedly. Even brief openings accumulate, especially when the mouth is wide or the closure is completely removed. A flip top or valve may reduce how much of the mouth is exposed, but frequency still matters.
This helps explain why a retention statement obtained under controlled conditions may not predict an individual’s experience. Ambient temperature, initial drink temperature, fill level, movement and opening routine can all differ from the conditions under which a figure was established. Retention information can be useful for comparison when the basis is clear, but it should not be treated as a promise for every routine.
Preheating and precooling condition the interior
When a flask is filled, the drink must exchange heat with the inner wall, the lower part of the stopper and any nearby internal components. If a room-temperature flask receives a hot drink, those components initially absorb some of its heat. If it receives a cold drink, the components give up heat to the drink.
Preheating or precooling reduces that initial difference. The usual principle is to place suitably warm or cold water in the flask briefly, close or cover it as appropriate, empty it, and then add the intended drink. This conditions the interior without changing the underlying insulation.
The effect will depend on the flask, starting temperatures and routine, so it should not be expected to guarantee a particular result. Users should follow the manufacturer’s care and temperature instructions, especially where materials, pressure or sudden temperature changes may be relevant. Conditioning is most useful when preserving the starting temperature is important and the extra preparation is practical.
How to judge a flask for the way you will use it
Rather than choosing from one headline number, consider how the complete design fits the intended routine:
- Mouth width: choose wider access for easier filling and cleaning, or a narrower opening where controlled drinking and reduced exposure are higher priorities.
- Closure complexity: balance one-handed pouring or sipping against the cleaning and inspection required by valves, straws, buttons and multiple seals.
- Expected fill level: select a capacity that will commonly be well used rather than carrying a mostly empty oversized flask.
- Opening pattern: distinguish between occasional serving and frequent direct drinking. The latter places more importance on a closure that opens quickly and exposes less of the contents.
- Seal care: check whether gaskets and closure parts are accessible enough to clean, inspect and reassemble correctly.
- Cleaning access: make sure the neck and lid suit the cleaning method realistically available. A theoretically efficient design is less useful if residue is difficult to remove.
A vacuum flask loses heat through a network of routes. The vacuum and reflective surfaces make the walls effective, but the neck, stopper, lid and every opening remain important. Real-world retention is consequently shaped by both construction and behaviour. Choosing the right flask means deciding which trade-offs suit the drink, serving pattern, cleaning routine and usual fill level – not simply selecting the largest capacity or the boldest retention claim.
Continue exploring on Frowse
Discover More Frowse Insights
- Inside a Duvet: How Fill and Construction Determine Warmth
- What Ceramic, Titanium and Tourmaline Really Mean on Hair Straighteners
- Speed Class, UHS and V-Rating: How to Read an SD Card
- Pressurised and Traditional Espresso Baskets Do Different Jobs
- Why Paper Weight Alone Cannot Tell You How Printer Paper Will Perform