





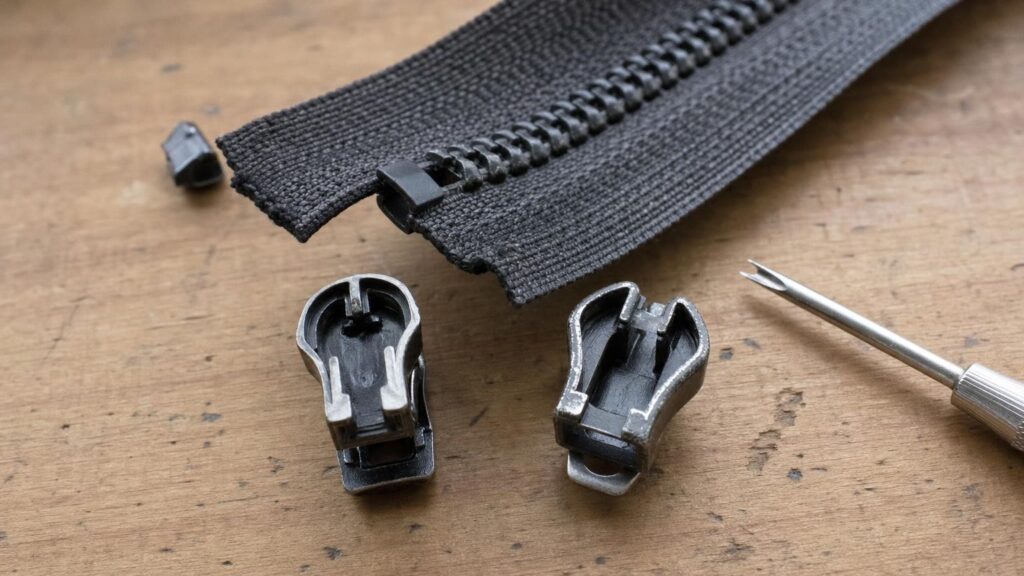
A replacement zip slider can look almost identical to the original and still refuse to fit, jam after a few centimetres or close the zip only for it to separate again. That is because a slider is not simply a clip that fits over any chain of roughly the same width. Its internal shape is designed around a particular type and profile of zip chain.
Finding a suitable replacement means identifying more than a stamped size number. Chain construction, element profile, tape thickness, locking mechanism, slider orientation, stops and the way the zip opens can all affect compatibility. Before buying, it helps to understand which details matter and which visual similarities can be misleading.
Why a Zip Slider That Looks Right May Still Not Fit
A complete zip consists of several parts. The chain is formed by the interlocking teeth or coil elements attached to fabric tapes. The slider moves along that chain and brings the two sides together or separates them. The pull tab is the part held by the user, while stops prevent the slider from running off the chain.
These parts are related but not interchangeable as a single category. A broken pull tab does not necessarily mean the slider body needs replacing. Equally, fitting a new pull cannot restore an internal locking component or reshape a worn slider.
The slider works by guiding the two sides of the chain through precisely shaped internal channels. Small differences in channel width, height or angle can determine whether the elements engage correctly. An approximate visual match is therefore only a starting point, not proof of compatibility.
Identify the Zip Chain Before Measuring Anything
The first useful distinction is the chain construction. Most everyday zips use coil, moulded-plastic or metal elements. A slider made for one construction will not usually work properly on another because each chain engages in a different way.
Coil zips
A coil zip uses a continuous synthetic filament formed into a spiral or related shape and stitched to the tape. The interlocking parts are formed by the coil rather than by separate teeth. Coil chains are common where flexibility and a relatively smooth profile are useful.
The slider must accommodate the shape, position and thickness of that coil. Some coil chains are presented in the conventional orientation, while reverse-coil designs place the coil towards the less visible side. Those arrangements can require differently orientated slider bodies even when the chain appears similar from the outside.
Moulded-plastic zips
These have individual plastic teeth moulded onto the tapes. The teeth are generally larger and more visibly defined than coil elements. Their contours, spacing and tape attachment determine the shape of the slider channel.
A moulded-plastic slider has to guide those tooth profiles into engagement without excessive clearance. A slider intended for a coil chain may not feed over them at all, while a superficially similar moulded-tooth slider may still be wrong for the specific profile.
Metal zips
Metal chains use individual metal teeth fixed to the tapes. As with moulded teeth, their dimensions and shape vary between chain families. The slider needs enough clearance to travel but must also hold both rows in the correct relationship as they interlock.
Do not identify a chain solely by colour. Plastic components can have metallic finishes, while painted or coated metal may not immediately look like bare metal. Inspect the sides and back of the chain as well as its visible face.
Why Nominal Zip Sizes Are Not Universal Standards
Numbers stamped on sliders or used in replacement listings can be useful clues, but they should not be treated as universal fit standards. A nominal size commonly relates to the general scale of the chain, yet the same number can be associated with different constructions, manufacturers or chain families.
Two chains described by the same nominal size may differ in tooth profile, joined-chain width, tape thickness or the dimensions needed inside the slider. Conversely, two sliders with different markings might belong to similar-looking products but have different functional designs.
Measuring only across the closed chain is also inadequate. That measurement does not reveal the height of the elements, the thickness of the tapes where they enter the slider or the internal geometry needed to bring the chain together. Measurements are most useful when compared with a supplier’s dimensional drawing or with a replacement explicitly identified for the same chain family.
The Slider Features That Control Compatibility
A slider body has two openings at the wider end and one joined opening at the narrower end. Inside, a central wedge and shaped channels guide the chain. When the slider moves in one direction, the two sides are brought together; in the other, the wedge separates them.
Several dimensions and features affect the result:
- Entry width and height: If the openings are too small, the chain will not feed. If they are too large, the slider may fail to control the elements.
- Internal channel profile: The channel must suit the element shape and the way it is attached to the tape.
- Central wedge geometry: This controls how the two sides are separated and brought into alignment.
- Body orientation: The upper and lower plates may be shaped for a particular face of the chain.
- Crown and pull attachment: The structure holding the pull may also form part of a locking mechanism.
An incorrect slider can fail in several ways. It may refuse to start, travel only with excessive force, wobble loosely or damage the tape. More deceptively, it may appear to close the zip while allowing the chain to split immediately behind it. That usually indicates that the slider is not holding the two sides in the required position, although worn or damaged chain elements can cause similar symptoms.
Locking, Non-Locking and Automatic-Lock Sliders
Slider function matters as well as fit. A non-locking slider can generally move when force is applied to it or the chain. This can be appropriate where free movement is intended.
A locking slider resists unintended movement. In many automatic-lock designs, lowering or releasing the pull allows a small component to engage with the chain. Lifting the pull disengages it so the slider can move. Other locking arrangements may rely on a different pull position or mechanism.
Consider how the original zip behaves. Does the slider stay in place when the pull is released? Must the pull be lifted before movement? The replacement should offer the function required by the item, not merely the same external finish.
If the pull tab has snapped but the slider still closes and locks correctly, replacing or adapting the pull may be enough. If the internal lock is worn, missing or jammed, a new tab will not repair it. Likewise, a decorative replacement pull should not be assumed to recreate the original locking action.
Opening Direction, Stops and Slider Orientation
Stops determine where the slider can travel and often where it can be removed or installed. A closed-end zip usually has a bottom stop joining the two sides and top stops that keep the slider on the chain. Replacing the slider may require careful access from an end after an appropriate stop has been removed. A suitable new stop or secure finishing method is then needed to prevent the replacement from running off.
Orientation is especially important with reverse-coil zips, where the chain is arranged to give a less visible exterior. A conventional coil slider that seems to match in size may place the pull on the wrong side or have internal geometry intended for the opposite presentation.
Double-slider arrangements add another variable. The sliders may face towards one another or away from one another depending on how the zip is intended to open. Matching chain type and size is not enough if the body is assembled in the wrong direction. Before removing anything, photograph both sides and note which end of each slider is wider, where each pull sits and how the sliders meet.
Closed-End, Open-End and Two-Way Zips
A closed-end zip remains joined at one end. It is commonly found where an opening needs to expand but the two sides do not need to separate completely.
An open-end zip, such as one used on many jackets, separates into two halves. It relies on an insertion pin on one tape and a retaining box on the other. To start correctly, the pin must pass fully through the slider and align with the box before the slider is raised.
This makes open-end repairs particularly sensitive to alignment. A replacement slider that is slightly wrong may prevent full insertion, bring the teeth together at the wrong point or place strain on the pin and box. If either of those bottom components is damaged or displaced, changing the slider alone may not solve the problem.
A two-way separable zip uses paired sliders so the fastening can open from the lower end while remaining joined elsewhere. The two sliders, insertion components and chain must work as a system. Their orientation and starting alignment are critical, so buying two broadly similar sliders is not necessarily enough to recreate the original arrangement.
Check Whether the Slider Is Actually the Fault
Before ordering a replacement, clean away visible dirt and inspect the whole chain under good light. Move the slider slowly and note where the failure occurs.
- If the zip separates directly behind the slider along otherwise even chain, the slider may be worn or spread.
- If the problem always occurs at one point, look for a bent, missing or deformed tooth, damaged coil or bunched stitching.
- If the slider is difficult throughout its travel, check for contamination, tape caught in the channel or a mismatch between the two sides.
- If an open-end zip will not start, inspect the insertion pin, box and lower chain alignment.
- If the slider runs off the end, a missing or displaced stop may be the main fault.
Gently compressing a spread slider is sometimes attempted as a short-term repair, but it is easy to make the body uneven or too tight. Excess pressure can create new jamming or chain damage. Even if adjustment restores engagement temporarily, worn internal surfaces may continue to cause trouble.
Replacement is also unlikely to succeed where the chain has missing elements, torn tape, failing stitching or damaged separable components. In those cases, replacing the complete zip may be more realistic than trying to make a new slider compensate for structural damage.
A Practical Pre-Purchase Matching Checklist
Collect evidence before removing the original slider or choosing a replacement:
- Identify the chain construction. Decide whether it is coil, moulded plastic or metal, and inspect both faces.
- Establish the zip configuration. Record whether it is closed-end, open-end, reverse-coil or a two-slider system.
- Keep the original slider. Compare its openings, body shape, orientation and crown directly with any proposed replacement.
- Record every marking. Treat letters, numbers and logos as identification clues, not guarantees of universal compatibility.
- Measure consistently. Note the closed-chain width and relevant slider dimensions, but compare them with a dimensional drawing rather than relying on width alone.
- Check locking behaviour. Observe whether the pull must be lifted and whether the slider locks when released.
- Note installation direction. Identify which stop can be accessed and how the slider must enter the chain.
- Inspect the chain for damage. Confirm that a sound replacement slider would have an intact chain, tape, stops and separable components to work with.
When assessing product information, look for an explicit chain type, detailed dimensions, orientation and compatible chain-family information. Broad wording such as “universal” or “fits common zips” provides less useful evidence than a clear description of the construction for which the slider was designed.
Choose by Construction, Not Appearance
The most reliable matching order is chain type first, followed by element profile and dimensions, slider function, orientation, stops and the zip’s separable or non-separable construction. Colour, finish and nominal size come after those functional details.
A visually convincing replacement may still have the wrong internal channel or locking arrangement. Keeping the old slider, documenting the zip before dismantling it and checking detailed compatibility information can reduce guesswork. Most importantly, confirm that the chain itself is sound. A new slider can guide a compatible, intact chain, but it cannot restore missing teeth, torn tape or damaged open-end hardware.
Continue exploring on Frowse
Discover More Frowse Insights
- Airflow, Airspeed and Nozzle Shape: How to Judge a Leaf Blower’s Real Capability
- What Changes Inside a Quartz Clock When the Second Hand Sweeps Instead of Ticks
- Why the Hook on a Tape Measure Is Supposed to Move
- What the Tilt Mechanism Under an Office Chair Actually Changes
- Why Scissors Stop Cutting Even When the Blades Still Feel Sharp