




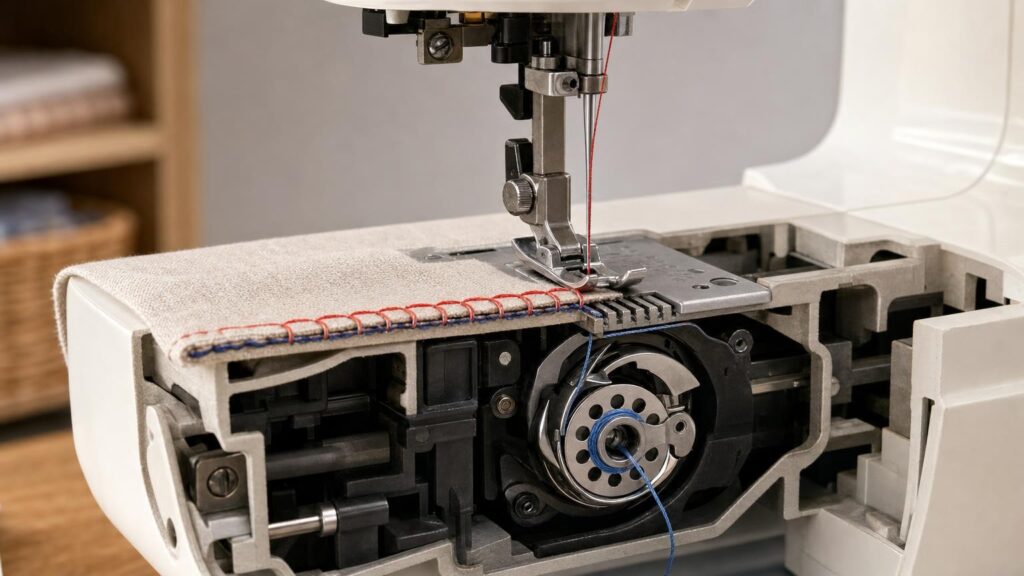
Feature lists for domestic sewing machines often mention hook systems, bobbin positions, feed mechanisms and presser-foot adjustments without explaining how they work together. Following a single stitch makes these terms much easier to assess.
In a typical lockstitch machine, the needle carries the upper thread through the fabric, the hook catches a loop of that thread, and the loop passes around the bobbin thread. The presser foot holds the material against the feed dogs, which advance it before the cycle repeats. Each part has a distinct role, but no part works in isolation. This is why a familiar mechanism in a poorly adjusted machine can perform less reliably than a supposedly simpler system that is correctly threaded, timed and maintained.
How a domestic sewing machine forms a lockstitch
The upper thread travels from the spool through guides and the tension system, then through the take-up mechanism and needle. As the needle descends, it carries the thread through the fabric. When it begins to rise, a small loop forms behind or beside the needle because the thread briefly slackens against the material.
The hook passes close to the needle and catches this loop. It then draws the upper thread around the bobbin area so that the upper and lower threads interlock. The take-up mechanism removes the remaining slack and pulls the interlock into the fabric. Ideally, the two threads meet within the material rather than forming obvious loops on either surface.
This sequence depends on several conditions:
- The needle must be correctly fitted, undamaged and suitable for the fabric and thread.
- The upper thread and bobbin must follow their intended thread paths.
- Upper and lower tensions must allow the threads to interlock in the material.
- The hook must reach the thread loop at the correct moment and pass sufficiently close to the needle.
- The presser foot and feed dogs must control the fabric while the stitch forms.
Skipped stitches, loops and thread breakage therefore cannot automatically be blamed on the hook design. Incorrect threading, a bent or unsuitable needle, lint, incompatible thread or disturbed timing can create similar symptoms.
What the hook design changes: rotary versus oscillating
A rotary hook travels continuously around the bobbin area in one direction. An oscillating hook moves through part of a circle and then reverses. Both can form a sound lockstitch, and neither name alone establishes the quality, strength or durability of a machine.
Continuous rotary motion can feel smooth because the hook does not reverse direction during every stitch cycle. An oscillating mechanism has a repeated change of direction, which may give it a different sound or mechanical feel. However, noise and vibration also depend on the frame, motor, bearings, tolerances, speed, lubrication and the surface supporting the machine. It is unwise to assume that every rotary-hook model will be quieter than every oscillating-hook model.
The two designs also guide the upper-thread loop around the bobbin area differently. This affects hook-race construction, cleaning access and the way a jam may be cleared. Servicing procedures can vary significantly between machines even when their hook descriptions are similar. For shoppers, the practical questions are whether the bobbin area is easy to inspect, whether lint can be removed as directed, and whether local servicing is available if timing or alignment needs professional attention.
Bobbin position is not the same as hook type
Top-loading and front-loading describe where and how the bobbin is inserted. Rotary and oscillating describe hook motion. These terms are sometimes used as if they were interchangeable, but a bobbin layout should not be used to infer hook type without checking the machine documentation.
A top-loading or drop-in bobbin is inserted beneath a cover on the sewing bed. A transparent cover may let the user see how much thread remains, although visibility varies with lighting, thread colour and cover design. This layout can also make routine bobbin changes convenient because the accessory compartment does not usually need to be opened.
A front-loading bobbin is commonly fitted into a removable case behind a cover at the front of the free-arm area. Some users appreciate being able to hold and thread a separate bobbin case, while others find access less convenient. The arrangement may allow bobbin removal without taking work off the main bed, but this depends on the project and machine shape.
Look beyond the label at insertion clarity, bobbin visibility, access for cleaning and the ease of recovering from a thread jam. Using the specified bobbin size and type is also important, since visually similar bobbins are not necessarily interchangeable.
Presser-foot pressure controls how firmly fabric is held
The presser foot keeps the fabric in controlled contact with the feed dogs. Pressure that is too low may let the material slip, lift with the needle or feed inconsistently. Excessive pressure can compress bulky seams, mark delicate surfaces or encourage some elastic and fine fabrics to stretch as they pass under the foot.
Adjustable presser-foot pressure lets the user alter this holding force. It can be useful when moving between fine cloth, stretchy knits, thick lofted material and layered assemblies. The adjustment is not a guarantee of perfect feeding, but it provides another way to balance grip with free movement.
Three controls that are often confused have different purposes:
- Presser-foot pressure changes how firmly the foot holds material against the feed dogs.
- Presser-foot height or lift changes the clearance available when positioning or removing fabric.
- Thread tension controls the resistance applied to thread as the stitch is formed.
Extra presser-foot lift can make a thick project easier to place under the foot, but it does not necessarily mean the machine can sew every thickness placed there. Needle penetration, motor control, seam density, foot movement and the machine’s intended use still matter.
Feed dogs move the work and determine stitch length
Feed dogs are the toothed bars that rise through slots in the needle plate. In a simplified cycle, they rise to grip the underside of the fabric, move it by a set distance, drop below the plate and return to their starting position. The presser foot supplies the opposing pressure that allows this motion to advance the material.
On a conventional machine, increasing the stitch-length setting generally increases the distance advanced between needle penetrations. Very short stitches can make a seam dense and difficult to unpick, while longer stitches are often useful for basting or some heavier materials. The appropriate setting depends on fabric, thread, seam purpose and stitch type.
Standard bottom feed works well for many everyday tasks, but supplementary systems address particular problems:
- A walking foot is a removable attachment that helps move the upper layers in coordination with the machine’s feed dogs. It is useful when layers tend to creep, though its motion and compatibility depend on the machine and attachment.
- Integrated dual feed adds a built-in upper-feeding element on compatible feet. It can be more convenient than fitting a separate walking foot, but shoppers should check which feet and stitch configurations can use it.
- Differential feed uses independently controlled feed sections to vary how fabric is delivered. It is commonly associated with overlock machines and some specialist equipment rather than being a standard feature of ordinary lockstitch machines. It can help manage stretching or intentional gathering.
These systems are not simply different strengths of the same feature. A walking or dual-feed arrangement mainly helps control multiple layers from above and below. Differential feed changes the relationship between feeding sections to manage how the material is stretched or compressed.
When feeding problems are really setup problems
Uneven movement does not always indicate an inadequate feed mechanism. Before treating an enhanced feed system as essential, it helps to connect the symptom with likely setup causes.
Fabric will not advance
Check whether the feed dogs have been lowered for free-motion work or darning and whether they have re-engaged properly. Confirm that the stitch length is not set at or near zero, lower the presser foot, and inspect the needle plate for packed lint. Avoid pulling the fabric, since this can deflect the needle and interfere with stitch formation.
Stitches are unexpectedly short or irregular
Heavy fabric, a dense seam junction or excessive foot pressure may restrict movement. A foot unsuitable for the surface can also drag. Test a suitable stitch length and needle on a scrap that reproduces the project’s actual layers rather than on a single piece of fabric.
Layers creep apart
Check that the layers are prepared and supported evenly. Reducing presser-foot pressure, where adjustable, may help if the upper layer is being pushed ahead. A walking foot or compatible dual-feed system may offer better control for quilting, long seams or slippery assemblies.
Fabric puckers or stretches
Puckering can result from unsuitable tension, dense stitching, thread choice or fabric being stretched during feeding. On elastic material, excessive foot pressure and an unsuitable stitch may contribute. Use an appropriate needle, support the fabric without pulling it and change one setting at a time so the cause remains identifiable.
The machine skips stitches
Start with a fresh, correctly fitted needle of a suitable type and size. Rethread the machine with the presser foot raised if the instructions require this, and confirm correct bobbin insertion. Persistent skipping after basic checks may indicate a hook-timing or clearance issue that calls for servicing rather than user adjustment.
Free arms change access, not stitch formation
A free arm is created when part of the flat sewing bed or accessory compartment is removed, leaving a narrower section around which tubular work can pass. It can improve access when sewing cuffs, sleeve ends, trouser hems and small openings.
It does not change how the lockstitch forms. Its value depends on its dimensions, the position of controls and covers, and how much clearance remains around the project. A narrow arm can help with small tubes, while a broad flat bed supports larger fabric pieces more effectively. Shoppers who regularly sew children’s clothing, narrow cuffs or bags should consider usable shape rather than accepting the presence of a free-arm label as sufficient.
Serviceability and mechanical access over years of ownership
Routine access can matter more over time than an impressive mechanism name. Look for a bobbin and hook area that can be opened and cleaned according to the instructions. Lint around the feed dogs and hook race can interfere with smooth operation, but oil should be added only where and when the manufacturer permits it. Some machines are designed for specified user lubrication; others are not.
Needles, bobbins and some accessories are routine replaceable items. Hook timing, internal tension calibration and electronic faults are different matters. A machine being described as mechanical or accessible does not mean every adjustment is suitable for home repair. Unnecessary changes to screws or factory settings can turn a simple threading problem into a service problem.
Mechanical controls may appeal to shoppers who value direct adjustment and straightforward operation. Electronic machines may add speed control, stitch selection assistance or other conveniences. The useful comparison is not whether one category is universally more repairable, but whether instructions, ordinary consumables and competent servicing are realistically available for the particular machine.
Choose the mechanism for the sewing you will actually do
For general alterations and everyday seams, prioritise consistent stitch formation, clear threading, manageable bobbin access and straightforward cleaning. If you frequently use fine, elastic, bulky or layered materials, adjustable presser-foot pressure and an appropriate supplementary feed option may be more valuable. Frequent colour changes can make convenient bobbin access particularly useful, while tubular projects justify close attention to the actual free-arm dimensions.
Most importantly, treat the machine as a coordinated system. Hook style, bobbin position, presser-foot pressure and feed design each influence the sewing experience, but none guarantees good results by itself. Correct setup, suitable needles and thread, controlled fabric handling and realistic maintenance are what allow those mechanisms to produce dependable stitches together.
Continue exploring on Frowse
Best Sellers · Top Rated · Best Value · Under £50 · Fresh Finds · Premium Picks
Discover More Frowse Insights
- Oscillating, Impact and Rotary Sprinklers: How Their Watering Patterns Differ
- Tempered Glass, PET, TPU and Liquid Adhesive Screen Protectors Explained
- Why a Universal Remote May Not Replace Every Original Remote Function
- Foil vs Rotary Electric Shavers: How the Cutting Mechanism Changes the Shave
- Phillips, Pozidriv and JIS: Why Cross-Head Drivers Are Not Interchangeable