




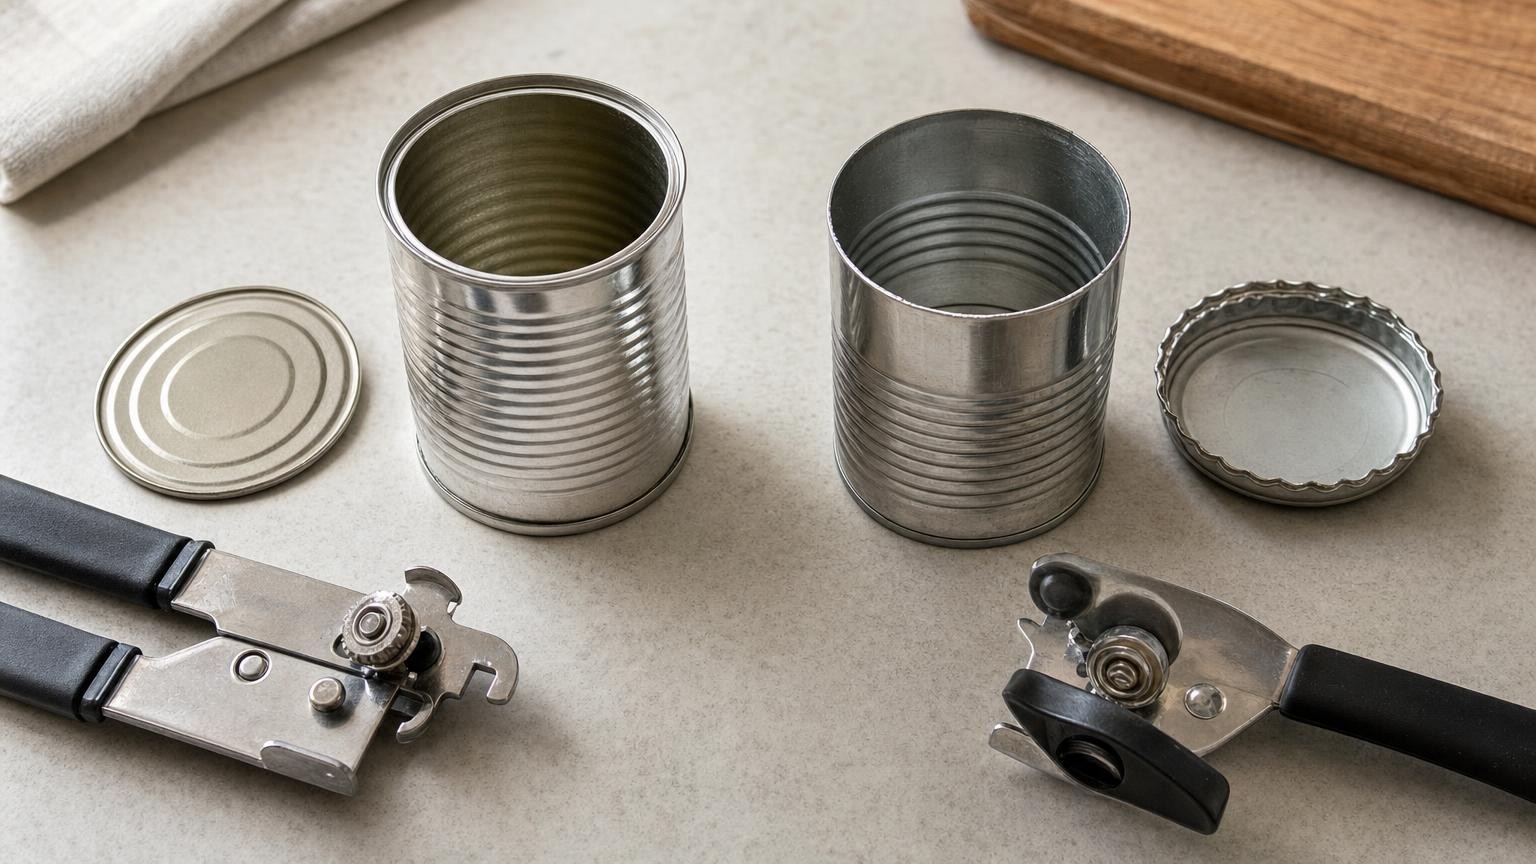
Manual can openers can look broadly similar while using two distinctly different cutting methods. A conventional top-cut opener pierces the lid just inside the raised rim. A side-cut opener works against the outside of the rim, cutting through or separating part of the folded seam that connects the lid to the can body.
That difference changes how the opener is positioned, how the lid comes away and which parts of the can are exposed after cutting. It can also affect compatibility with unusual rims, the way residue reaches the mechanism and the amount of grip or control required. Comparing these practical details is more useful than assuming either cutting style is universally better.
Why the cutting position changes the whole opening experience
A typical metal can is sealed by folding layers of the lid and can body together to form a raised seam. Top-cut and side-cut openers act on different parts of this construction.
A top-cut opener leaves the folded seam attached to the can. Its cutting wheel travels through the flat lid immediately inside the rim, creating a separate metal disc. A side-cut opener engages the seam from the exterior and usually separates the lid together with part of the rim assembly.
This mechanical distinction influences the whole process. Top-cut openers usually sit partly over the lid and require enough clamping force to pierce it. Side-cut models approach the rim from another angle and may initially feel less intuitive. The resulting lid, exposed edges and contact between the cutter and the can contents also differ.
Cutting position is only one part of performance. Wheel alignment, drive teeth, gearing, handle rigidity and the condition of the can rim all affect whether an opener travels smoothly.
How top-cut openers pierce and travel around the lid
A conventional top-cut opener commonly uses two handles, a sharpened cutting wheel, a toothed drive wheel and a turning knob. Opening the handles creates a gap for the can rim. Squeezing them together clamps the mechanism in place and pushes the cutting wheel through the lid near its outer edge.
When the knob turns, the toothed wheel grips the rim and pulls the opener around the circumference. The drive system controls the forward movement while the cutting wheel continues slicing through the lid. The user supplies turning force but should not need to push the whole tool manually around the can.
Placement and pressure are important. If the opener is tilted, clamped too far from the rim or allowed to move sideways, the drive wheel may slip. The cutter may then stop, leave an uncut section or create an irregular path. Once the lid has been pierced, an even turning motion is generally preferable to repeatedly squeezing the handles or forcing the knob.
After one circuit, the cut should meet its starting point. The lid may come free or remain connected by a small tab. If an opener routinely needs several passes on ordinary, undamaged cans, the cause may be incorrect positioning, residue on the wheels, poor alignment or wear.
How side-cut openers separate the folded seam
A side-cut opener is positioned against the outer side of the raised rim rather than directly over the lid. Its drive and cutting components grip the seam and travel around the can as the knob is turned. Instead of cutting a circle through the lid, the mechanism cuts through or separates part of the folded connection.
Many designs therefore release the lid and upper rim as one piece. The exact way this piece is lifted or released depends on the opener’s mechanism. Some tools retain or grip the lid temporarily, while others require it to be lifted separately.
The placement can be unfamiliar for someone used to top cutting. The opener may appear to be facing the wrong direction until its wheels are correctly aligned with the side of the seam. Starting squarely on a straight, undamaged section helps both wheels make consistent contact.
Forcing a side-cut opener while it is angled can cause the mechanism to slip or work repeatedly on one section instead of advancing. If it does not begin travelling after careful repositioning, the opener may not match that rim profile.
The edges and lids each method leaves behind
A top-cut opener leaves the rolled rim attached to the can and produces a disc cut from inside it. Both the detached lid and the inner edge around the opening can require careful handling. If the lid falls into the contents, retrieving it may also bring the lid’s exterior surface into contact with the food.
A side-cut mechanism commonly removes the lid with part of the folded rim still attached. This gives the detached piece a different shape and can provide an outer boundary from which to lift it. However, terms such as smooth edge should not be taken to mean that every resulting surface will be completely blunt. The can’s construction, rim condition, cutter alignment and blade wear can all influence the finish.
The two methods also affect draining. With a top-cut opener, some users leave a small section attached and hold the lid near the opening while pouring liquid away. That still involves controlling a cut piece of metal. A fully separated side-cut lid is less suited to the same technique, so a separate strainer may offer better control when draining is a regular task.
A side-cut lid may rest on top of the opened can, but it should not be treated as a secure or sealed closure. It can shift or fall off if the can is moved.
Can shape, rim condition and opener compatibility
The label top-cut or side-cut does not establish compatibility with every can. The opener must fit around the rim, maintain its alignment and follow the full circumference without another part of the tool obstructing its movement.
Several can characteristics can affect engagement:
- Small diameters: A large opener head may struggle to follow a tight curve while keeping both wheels in contact.
- Shallow cans: Handles or the body of the opener may touch the work surface before the mechanism sits correctly.
- Tall or unusual rims: The cutter and drive wheel may not reach their intended contact points.
- Non-round shapes: Corners and changing curves can interrupt smooth travel, depending on the geometry of the opener.
- Dented rims: Distortion can push the wheels apart, change the cutting path or stop the drive wheel from gripping.
- Pull-tab lids: A raised tab or scored section may obstruct placement when an opener is used instead of the tab.
Starting away from a damaged section may help the opener engage initially, but it can still stop when it reaches the deformation. Applying extra force rarely solves a basic mismatch between the mechanism and the seam.
Cleanliness and maintenance depend on where the blade travels
A top-cut blade pierces the lid close to the contents. Depending on the fill level and consistency of the food, the cutter may encounter liquid or residue. Material can also collect around the toothed drive wheel, reducing grip or making the mechanism harder to turn.
A side-cut opener works around the exterior seam, but that does not make it maintenance-free. Dust, dried spills and other residue can accumulate around the rim during storage and handling. The wheels and narrow gaps in the opener may pick up this material as they travel.
Wiping the lid and rim before opening can reduce the amount of exterior residue carried towards the opening. It does not replace cleaning the opener itself.
Follow the care instructions for the individual tool rather than assuming that every manual opener can be immersed or placed in a dishwasher. Water retained inside enclosed gears, axles or joints can contribute to corrosion or interfere with movement. Where immersion is not advised, accessible surfaces can be wiped and debris around the wheel or teeth removed with a suitable small brush. The opener should be dried thoroughly before storage.
Grip, leverage and control in real use
Cutter position alone does not determine how much effort an opener requires. Handle length influences leverage during clamping, while knob diameter and shape affect turning. Gearing transfers force to the drive wheel, and rigid pivots help keep the cutting and driving components aligned.
Top-cut designs usually require a firm squeeze to pierce the lid. Some also require the handles to remain together while the knob turns. Side-cut layouts may clamp differently, but they still need controlled placement and enough pressure for the drive mechanism to engage.
When comparing layouts, consider the complete opening sequence:
- Must the handles be squeezed continuously?
- Is the knob large enough to hold without the fingers crowding the opener head?
- Can the opener be positioned while the wrist remains comfortable?
- Does the mechanism stay attached once cutting starts?
- How is the detached lid released?
These questions can be particularly relevant for anyone with reduced grip strength or limited dexterity, but individual comfort cannot be inferred from handle size alone. A bulky knob may be easy to grasp yet awkwardly positioned, while long handles may provide leverage but interfere with shallow cans.
Handedness also deserves attention. A tool that looks symmetrical may still place its knob, wheels or lid-release control more conveniently for one hand. The direction of travel and the need to stabilise the can should be considered together.
Wear points and signs of poor engagement
The cutting wheel and drive teeth repeatedly contact metal. Axles, gears, handles and pivot joints also carry load whenever the opener clamps and turns. With use, the cutter may become dull, drive teeth may lose definition and joints may develop sideways movement.
One slipping incident does not necessarily indicate wear. First check that the opener is positioned correctly, the rim is not dented and the wheels are free from grease or dried residue. A dirty drive wheel can lose traction even when its teeth remain intact.
Problems occurring across several ordinary, undamaged cans are more suggestive of deterioration or misalignment. Relevant signs include:
- Persistent skipping despite careful placement
- Visible wobble in the cutting or drive wheel
- Handles that flex or no longer clamp securely
- A knob that turns without advancing the opener
- Cuts that repeatedly stop before completing the circuit
- A recurring need for several passes
Extra force does not restore a dull wheel or a loose axle. It can instead deform the lid or rim and make engagement less predictable.
Choosing between top-cut and side-cut designs
A top-cut opener may suit someone who prefers familiar positioning, direct cutting through the lid and the ability to leave a small section attached when pouring. Its cutter works close to the contents, and the resulting lid and inner edge require considered handling.
A side-cut design may suit someone who prefers the lid and upper rim to separate together. Its placement takes some adjustment, and its compatibility still depends on the dimensions and condition of the seam. The resulting edge should not automatically be assumed to be blunt, nor should the detached lid be treated as a secure cover.
Before choosing, consider the cans you open most often, including their diameter, depth, shape and rim profile. Then assess handle leverage, knob size, opening direction, lid-release method and cleaning instructions. Cutting style explains how the tool approaches the can, but fit, alignment, control and maintenance determine how well that method works in everyday use.
Continue exploring on Frowse
Best Sellers · Top Rated · Fresh Finds · Under £50
Explore products on Amazon
Looking for products related to this guide? to enter your own search term.
Discover More Frowse Insights
- Why a New Toner Cartridge Does Not Renew Every Wearing Part in a Laser Printer
- Scraping, Absorbing and Draining: Why Doormats Behave So Differently
- What a Surge Protector’s Joule Rating Means and Why Protection Wears Out
- What Makes Suitcase Wheels Smooth, Stable and Repairable?
- Why Identical-Looking USB-C Cables Can Perform Completely Different Jobs